Learn the basics of Sound Particles 2 such as creating a project, creating a particle group, importing audio files, rendering, and exporting your audio.
In this tutorial, Diogo briefly explains the basics of Sound Particles 2, and how to create a simple project.
Sound Particles is a native 3D audio software that uses computer graphics techniques and applies them to sound. By using concepts as particle systems or computer graphics integration, creating thousands of complex sounds and working with them in a 3D environment is much easier and faster than with traditional methods.
Creating sounds in Sound Particles is as simple as adding a Particle Track (each particle being a sound source), importing sound effects to the track (each sound effect will be assigned to one or more particles), and adding a virtual microphone to capture the surrounding sounds, and render the scene.
Templates
Sound Particles provides several project templates, accessible when opening the application.
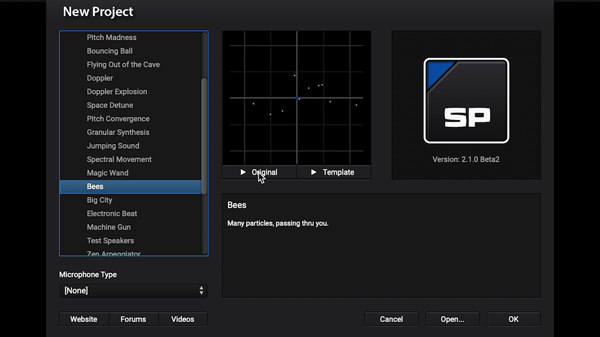
In the "New Project" window it's possible to preview visually the several templates, as well as compare between the original and altered audio samples of each template.
Diogo explores some of the available templates such as Doppler and Bees, but to get into the details of how Sound Particles works, he creates a futuristic soundscape from scratch by selecting "Empty".
Project Window
The Project Window is where most of the magic happens. Here it's possible to shape the scene, access the several available tools and preview the project.
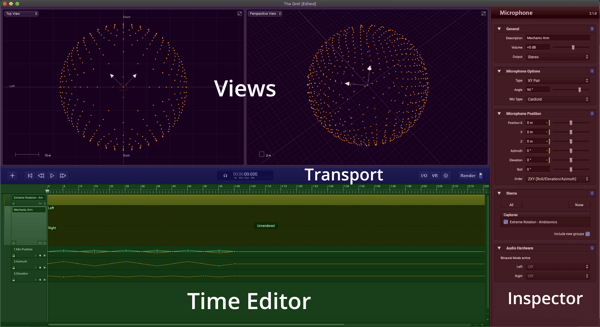
Views
The views area is where it is possible to observe and edit the scene and its objects through various perspectives. It can be used as a Dual or Single View, and has several types of view available:
- 3D Views - there are fixed 3D views like "Top View" or "Front View", and there is the "Perspective View" where it is possible to control the perspective and work in a truly 3D environment.
- Video View - When a video reference is imported to the project, it is possible to view the video by itself in this view type.
- 360º View - This view represents 3D space the same way a world map (rectangle) represents the Globe (sphere) - Azimuth represented in the horizontal axis and elevation in the vertical axis. This view is useful when working with particles on top of videos, both for standard or full 360º videos.
- VR Views - This view allows a 360º camera perspective, with the particles placed as shaped on the scene.
Transport
The Transport bar allows for various actions regarding the project:
- Add - By clicking the "Add" button it's possible to add Audio Tracks, Particle Groups, Particle Emitters, Microphones, and Video References.
- Playback Controller - These four buttons are used to control the playback of the scene.
- Mini Display - The mini display shows the current time, the binaural monitoring "On" mode, and the "VR" app label.
- I/O - Clicking this button will access the I/O inspector, allowing the control of some hardware settings, the audio preview outputs and gain, and the binaural monitoring settings.
- VR - Control the VR client app settings.
- Project Settings - Control if original audio files and rendered audio are included in the saved project, set the sample rate of the rendered audio, and enable/disable and control sound propagation effects such as air delay, distance attenuation, and doppler effect.
- Manual Render - Manually render the scene.
- Auto-render toggle - Activate/deactivate the Auto-render mode, where the scene is rendered in real-time when playback is activated.
Time Editor
This is where all the elements (tracks) and their automation are displayed.
It is possible to place, move, and organize the items. Clicking a track gives access to each track Inspector to edit its parameters and configurations. On the left end of each track it is also possible to SOLO or MUTE through the "M" and "S" buttons, and add Automation by clicking the "+" button.
This is also where it's possible to place the playhead in the timeline and see the time sub-divisions.
Inspector
The Inspector panel, on the right side of the screen, allows access to all the options and parameters related to a certain track or utility.
Particle Tracks
Particle Tracks are objects that create particles in the scene. You can control the number of particles, how the particles are distributed in space, at what rate they appear, how they move, etc.
There are three different types of Particle tracks:
- Particle group
- Particle emitter
- Single sound sources (e.g. a single particle emitting a mono sound)
Additionally, it is possible to opt for an Audio Track, that only allows importing a single audio file which can then create a specific number of particles, according to the number of channels of the audio file imported to the track (mono, stereo, 5.1, 7.1, Ambisonics, etc).
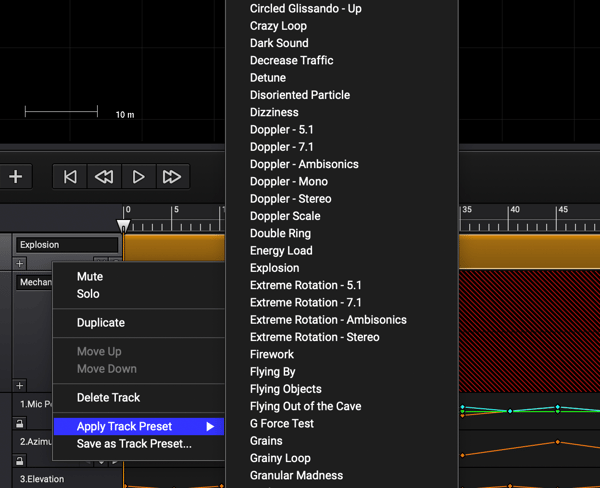
There are over 80 track presets available to choose from, plus microphone presets.
In this tutorial, Diogo starts by adding a Particle group. In this case, the particles are randomly distributed through space according to the shape and probability distribution selected for the group.
Microphone
To render the audio there must be a virtual microphone track so that the virtual microphone captures the surrounding events on the 3D scene.
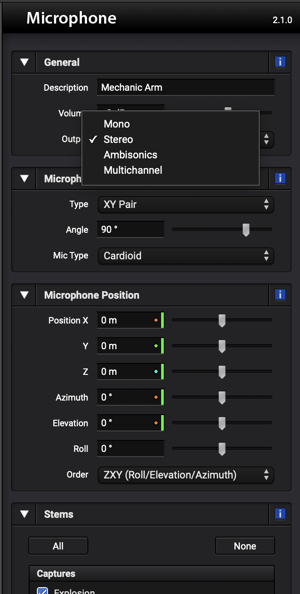
There are several microphone presets, and it's possible to control the microphone options on the inspector panel.
The following are the different types of microphone available to choose in the inspector panel:
- Mono - A single microphone capsule that can be omnidirectional, figure-of-eight, cardioid, or hypercardioid.
- Stereo - A pair of microphone capsules or more, arranged in a standard format (mid/side pair, XY pair, Blumlein pair, AB pair, ORTF pair, or Decca Tree) or a custom variation of one of the available formats.
- Ambisonics - Ambisonics microphones have 4 or more capsules arranged in a way that can capture sound from any direction surrounding the microphone and create a 3D representation of sound. In Sound Particles, it's possible to choose Ambisonics formats up to 6th order.
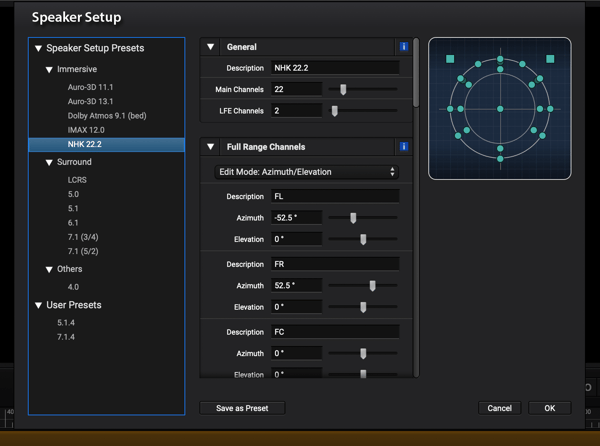
- Multichannel - For multichannel, the system uses “Vector Base Amplitude Panning (VBAP)”, which is capable of complex setups. To choose from the various possible setups or create a new custom one, open the "Speaker Setup" panel.
Modifiers
To work with large quantities of particles, which means, large quantities of sound sources, Sound Particles has random modifiers. These modifiers add organic movement and audio diversity to the scene. As with the position of the particles, it's possible to control the probability distribution of these modifiers. It is also possible to add as many modifiers as one wishes to, including several modifiers of the same type.
There are two types of modifiers:
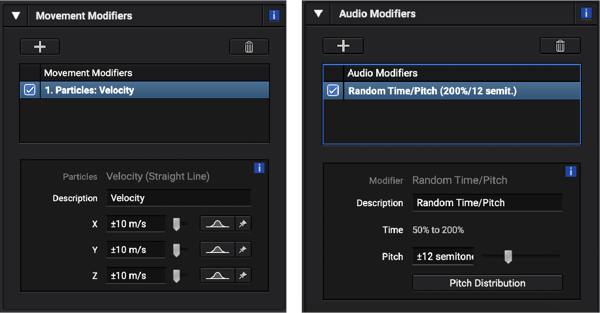
- Movement Modifiers - Add movement to the particles or the emitter. It is possible to add velocity (straight line/rotation), or acceleration (straight line/rotation),
- Audio modifiers - Make each particle sound slightly different from other particles with random EQs, random gains, random delays, random filters/bands, granular synthesis, or random time/pitch.
By using a particle group, importing several tech sounds, and applying a random straight line velocity modifier, a random pitch/time modifier, and a random delay modifier, in a few minutes it's possible to create a complex texture.

This video tutorial is part of the Sound Particles 2 Tutorials series, available on Sound Particles Youtube channel.
To find out more about the newly released Sound Particles 2.1 features, read our Meet Sound Particles 2.1 article.
Topics: Sound Particles, Audio Software, Sound Design, Tutorials